- Initial ideas
- Location scouting
- First scene list
- Updated scene list
- Props
- The zombie characters
- Donnie Romero
- Costume and makeup
- Mia Jones
- Filming equipment
- Call sheets
- Screenplay
- Storyboard
IDEAS
ACTORS:
- Central protagonist - Danny Romero
- Love interest - Mia Jones
- Best friend - Fred East - intertextualises with Fred West (serial killer)
- 2/3 zombies
- Intertextualising genre directors (Danny Boyle, George A Romero) - Danny Romero
- Cornetto franchise reference - possibly worms eye view - steps on cornetto wrapper - strawberry flavour connotes blood
- see zombie in bathroom + outside (chasing him) + zombie eating dead body
- Shallow focus (zombie eating body from far away)
- decaying title
- slow zombie movement type
...
...
ADDITIONAL NOTES
- The construction work there should hopefully be done by the time we film.
- I think that the cul de sac is a good place to have a car as it won't block anyone trying to get past.
- The 'dead body' coming out of the car could have a zombie attacking it, but then we would need to think about how our protagonist wouldn't see it.
- We could use the front of the house on the end as Donnie Romero's home (but probably not the inside as it doesn't have what we want.
...
...
ADDITIONAL NOTES


These are some videos of possible areas to film, in our film opening, however it is not necessarily going to be filmed in these locations, this is just part of the pre-production.
...
...
...
Benefits of Filming
- Space to film in
- Lots of mise-en-scene already available
Disadvantages of Filming
- Lots of removal in order to place correct props and create mise-en-scene, as to get preferred reading
- Not the best as far as social class, it doesn't fit the middle class stereotype
- Awkward for group members to get to
...
...
...
Benefits of Filming
- Space to film in
- Lots of mise-en-scene already available
- Has mirrors we wanted for certain camera angle
Disadvantages of Filming
- Awkward removal of items in order to place correct props and create mise-en-scene, as to get preferred reading
- Not the best as far as social class, it doesn't fit the middle class stereotype
- Awkward for group members to get to
...
...
...
Benefits of Filming
- Lots of mise-en-scene already available
- Fits the social class
Disadvantages of Filming
- Not a lot of space to film
- Challenge to avoid fill-in balcony window
- Awkward for group members to get to
PROPS
These are some of the props we will be using that I have accumulated. We may make some changes as to which props we will actually use.
...

 Our film opening is going to be a zom-rom-com, meaning we need to plan a look for our zombie characters. It is important we get this look correct to obtain verisimilitude. Our plan is for our zombie to have white eyes (to show they aren't alive), several wounds/cuts across the face, white face, ripped/dirty clothes and then covered in blood. This style is inspired by the zombies in Shaun of the Dead. They are all wearing normal clothing, however its all hanging off them as if it was unnatural. Looking at the close up of Nick Frost, you can see his face has been covered in white powder/paint to show the character is lifeless. We have ordered white contact lenses from amazon to create the same effect as Shaun of the Dead. We have blood capsules as well, meaning we would be able to create a similar effect to what is going on around Nick Frost's mouth.
 Liquid latex - we ordered some to create any disfigured sections of the zombies face.
Equipment to create scars/cuts - we have been practicing creating realistic cuts. On the right is an image of some practice cuts I have done on my arm (using glue, makeup and pens).
White make-up - we have access to makeup that could be applied to the face to create the dead look.
Fake blood - could be applied to face or clothing
Contact lenses - we have ordered 2 pairs of white contact lenses.
We haven't made any specific plans for clothing yet, however preferably baggy clothing that can be covered in blood. The point is for it to look like the zombies have been turned immediately from their normal self to a zombie, which is why they would be dressed in clothing that they would usually wear.
Once again, inspired by Shaun of the Dead. We chose to go for a slow zombie because we felt it would be easily distinguishable between the zombies and the normal characters. For example if our characters, Donnie, Fred or Mia, are running away, the comedy would be in the style of the slow walk.
Similar to the sounds above, the generic zombie noise would work well for our scene, as it has been used in several zombie movies before.
VIDEO


MAKEUP
INSPIRATION


 Small Tripod - convenient for worms eye view shots
iPhone 11 - the highest quality out of all iPhone cameras. Has a very wide angle lens (improving the issue of recording in small rooms). Similar quality to proper camera
 Large Tripod - gives the shots stability and gives us the opportunity to adjust heights if need be
...
ADDITIONAL NOTES
- The Shaun of the Dead scene i'm referencing (from around 40seconds)
...
...
- I was thinking of having Donnie not seeing the zombie rather than him seeing it as there would be no reason for him to think it is normal like how they think the zombie is just a drunk guy in Shaun of the Dead.
- The field is very long so it wouldn't need to be very obvious.
BATHROOM
(This post was originally created by Spikey Films)


LIVING ROOM


KITCHEN


(This post was originally by Bright Films)
These are some videos of possible areas to film, in our film opening, however it is not necessarily going to be filmed in these locations, this is just part of the pre-production.
LIVING ROOM
......
...
...
Benefits of Filming
- Space to film in
- Lots of mise-en-scene already available
Disadvantages of Filming
- Lots of removal in order to place correct props and create mise-en-scene, as to get preferred reading
- Not the best as far as social class, it doesn't fit the middle class stereotype
- Awkward for group members to get to
BATHROOM
......
...
...
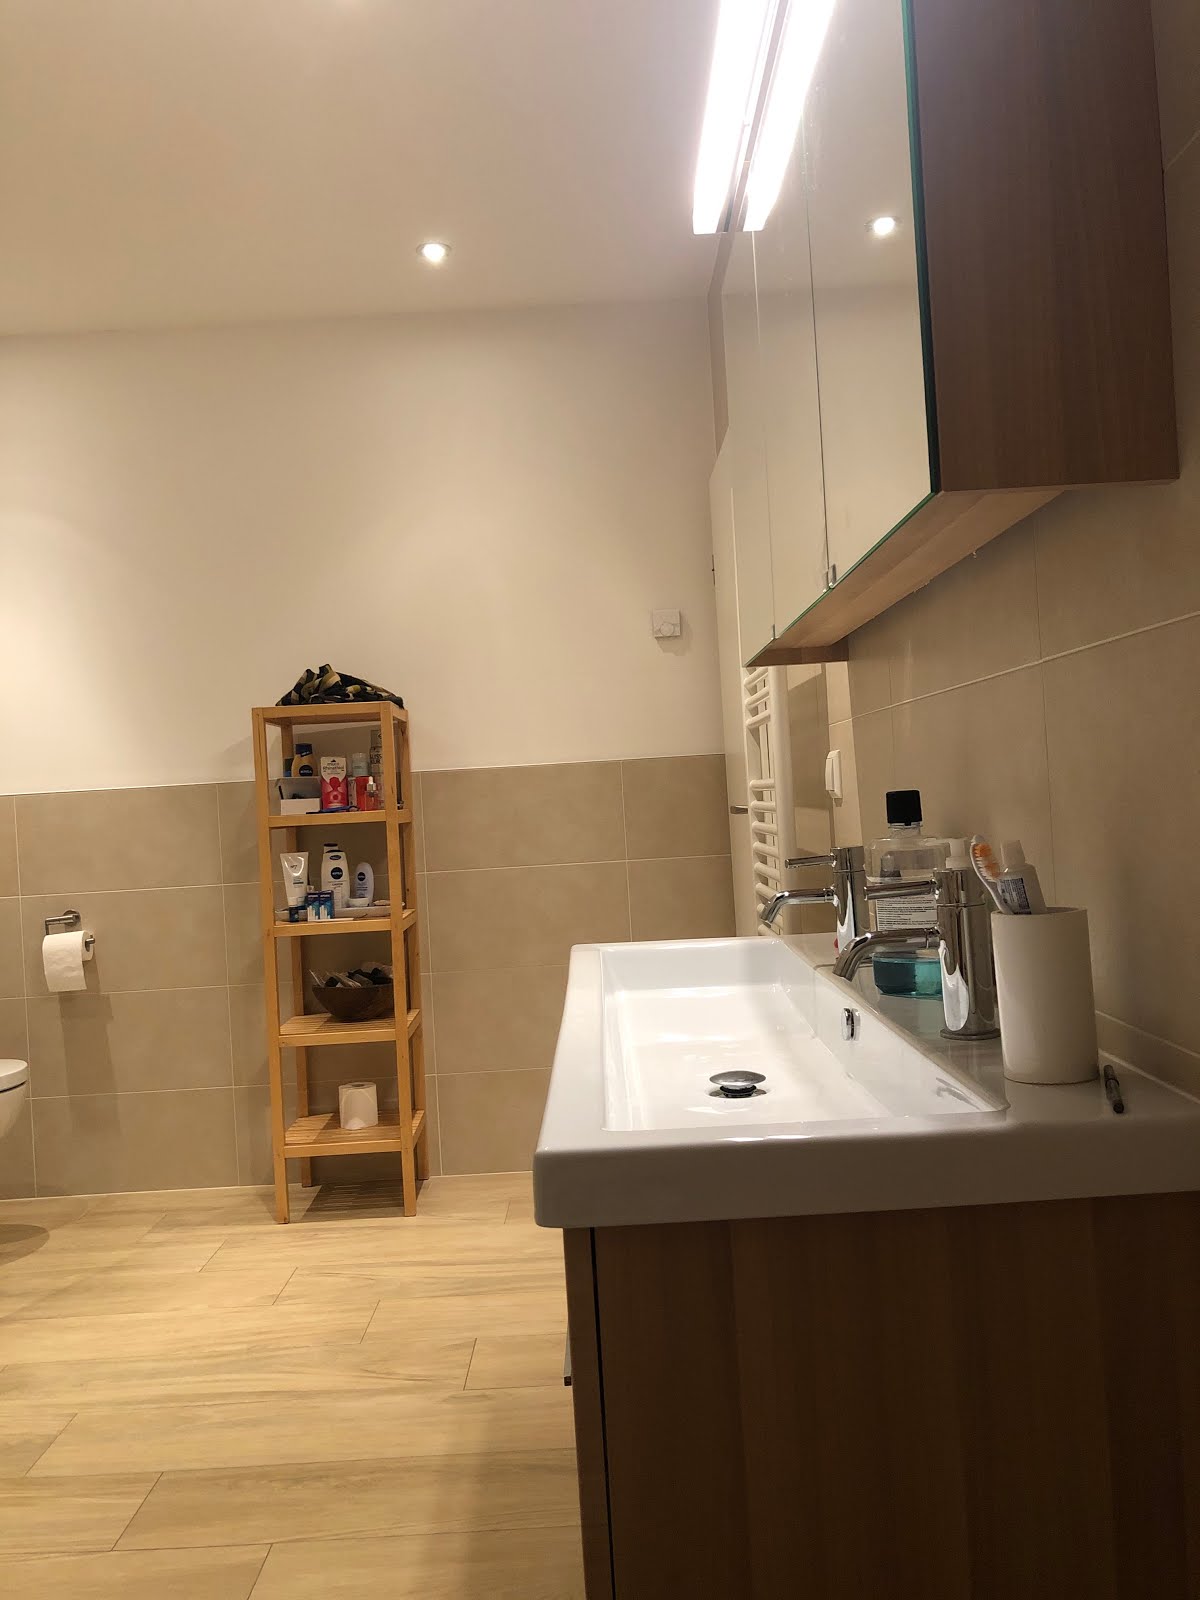
Benefits of Filming
- Space to film in
- Lots of mise-en-scene already available
- Has mirrors we wanted for certain camera angle
Disadvantages of Filming
- Awkward removal of items in order to place correct props and create mise-en-scene, as to get preferred reading
- Not the best as far as social class, it doesn't fit the middle class stereotype
- Awkward for group members to get to
KITCHEN
......
...
...
Benefits of Filming
- Lots of mise-en-scene already available
- Fits the social class
Disadvantages of Filming
- Not a lot of space to film
- Challenge to avoid fill-in balcony window
- Awkward for group members to get to
UPDATED SCENE LIST
PROPS
These are some of the props we will be using that I have accumulated. We may make some changes as to which props we will actually use.
...
Props from EmmaScoble1
...
Zombie Character
(This post was originally created by Spikey Films)

 Our film opening is going to be a zom-rom-com, meaning we need to plan a look for our zombie characters. It is important we get this look correct to obtain verisimilitude. Our plan is for our zombie to have white eyes (to show they aren't alive), several wounds/cuts across the face, white face, ripped/dirty clothes and then covered in blood. This style is inspired by the zombies in Shaun of the Dead. They are all wearing normal clothing, however its all hanging off them as if it was unnatural. Looking at the close up of Nick Frost, you can see his face has been covered in white powder/paint to show the character is lifeless. We have ordered white contact lenses from amazon to create the same effect as Shaun of the Dead. We have blood capsules as well, meaning we would be able to create a similar effect to what is going on around Nick Frost's mouth.
Resources
 Liquid latex - we ordered some to create any disfigured sections of the zombies face.
Equipment to create scars/cuts - we have been practicing creating realistic cuts. On the right is an image of some practice cuts I have done on my arm (using glue, makeup and pens).
White make-up - we have access to makeup that could be applied to the face to create the dead look.
Fake blood - could be applied to face or clothing
Contact lenses - we have ordered 2 pairs of white contact lenses.
Clothing
We haven't made any specific plans for clothing yet, however preferably baggy clothing that can be covered in blood. The point is for it to look like the zombies have been turned immediately from their normal self to a zombie, which is why they would be dressed in clothing that they would usually wear.
Walk
Once again, inspired by Shaun of the Dead. We chose to go for a slow zombie because we felt it would be easily distinguishable between the zombies and the normal characters. For example if our characters, Donnie, Fred or Mia, are running away, the comedy would be in the style of the slow walk.
Sound
Similar to the sounds above, the generic zombie noise would work well for our scene, as it has been used in several zombie movies before.
CHARACTERS
DONNIE ROMERO
(This post was originally by Spikey Films)
This post is about the costumes and props we will use for the character Donnie Romero.
ZOMBIES
(This post was originally by Bright Films)
COSTUME + MAKEUP
I put together a slide show of the topics covered, meaning the points specifically about the zombie makeup our group talked about with our teacher and the improvements and additional points that were discussed thereafter, I will go over them in depth underneath.
...
...
...
...
(Slide 2) The test and influences have been covered in recent posts so a summary is:
We have heavily intertextualised elements of Shaun of the Dead, where some elements are close to a simulacra (Baudrillard) following a postmodernism theory, anchoring the preferred reading because if it is left as a polysemic reading, following many examples in the film industry, the preferred reading will be lost as the primary and secondary audience will have no anchorage to access it.
One of these elements is the makeup and therefore we are drawing heavy inspiration from zombie characters in Shaun of The Dead, especially Nick Frost's
One of these elements is the makeup and therefore we are drawing heavy inspiration from zombie characters in Shaun of The Dead, especially Nick Frost's
(Slide 3) The Improvements from the first makeup test are:
- Firstly to include more blue and purple makeup, in the bruised areas of the zombies face's. This will make the look clearer on screen anchoring the fact that it is a zombie, not someone dressed as one.
- The hair wasn't worked on but we are probably going to add talcum powder to make it look more scruffy and dirty
- More white face paint needs to be used to make the character look pale, which is symbolic and connotes zombies as they are cold and dead, however in the example above that wasn't as clear so to anchor that we are going to use more white face paint.
- We didn't use the contacts we ordered as they had not arrived at this point, but they have now arrived so in are next makeup test we will get a completed look for the makeup.
- We also were unable to use liquid latex due to only Spikey Films and Scope Productions being together for the first test and neither of them had liquid latex with them.
(Slide 4) Additional points about the Zombie look
- One of the zombies will have the pleasure of eating a dead corpses guts and we are going to attempt to achieve this using shallow field of focus and focusing heavily on the audio in post production editing.
- We need to use blood capsules for the zombies but we don't know how the effect will appear so we are looking to test that soon
- We have decided to not film Sunday as we feel we need to test more points
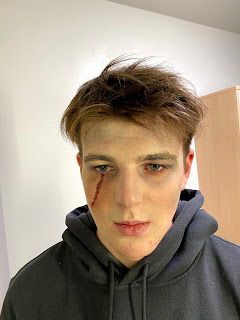
This zombie makeup didn't turn out too bad. We will be making a few changes for the next time we try it out. For example, we won't use the green highlighter underneath the white makeup. I think it was a good idea, however, it made him look too lively. We will also try pick up some supplies like face paint or a whiter foundation as the makeup I already have isn't as white as we wanted. As we said in the video, we will make the scar go up through the eye and have the contact in that eye. I think the bags under the eyes aren't too bad and I like the bruising around the scar. The rest of his face just needs to look more zombie-like.
VIDEO
...
...
PHOTOS


I've bought some more makeup to help with the zombie makeup because I think it needs some improvement.
 |
| Blue Face Paint |
I think we could possibly use the blue face paint as a bit of discolouration for the zombie's face. I think it will make it look a bit more gruesome without making the age rating go up.
 |
| Grey Face Paint |
The grey face paint is vital to show the lack of life in the zombie.
 |
| White Face Paint |
I think the white face paint will be useful but we need to make sure it's not too white so it looks ghostly.
 |
| Green Face Paint |
The green face paint, like the blue, can be used to make the zombie's face look a bit discoloured.
 |
| Fake Blood |
Obviously fake blood is a massive part of this. It is important we use something that isn't going to irritate skin and this one is specifically for the face.
 |
| Red Lipstick |
We could use this red lipstick for blood. It might cause a bit of a problem as it is matte. This could make it look very unrealistic and not the look we are going for.
 |
| Eyeshadow Palette |
This eyeshadow palette may be a bit too bright for the look we're going for. However, we may be able to use the blue and green shades to set the blue and green face paint.
I'm doing some more research for the zombie makeup as I believe ours could look better. We are using liquid latex, so I've watched some videos on zombie makeup which has liquid latex scars/cuts.
...
...
I think her makeup was a bit too excessive for what we're looking for so we will take inspiration from the liquid latex technique but not the eye makeup. I think that we will have the makeup look more like how we had it before.
...
...
The makeup is a lot more what we're looking for on this video. I thought that the tissue was a bit more obvious which I didn't like, however, I like how she covered it with the fake blood. I also like the effect the sponge gave with the blood.
...
...
I think this way of doing the cut is really cool and very different. It might be a bit too complicated for our first try but I think it is worth a go. I really like the red on the waterline with black/grey just underneath. I also really like how she did her lips.
We tried to test out the zombie makeup again but with face paints this time. We hadn't tested out these face paints previously so this was a trial. We decided to not have the green highlighter underneath this time as it made the look too lively last time and I think the more matte it is, the less life-like it looks. We were taking more inspiration from videos I had previously researched, but we weren't actually following anything. I think that's where we went wrong. If we had followed the videos a bit more closely, I think it could have turned out very well. Yet again, I think we had a bit too much colour with the blue so next time we will make it more grey. We also didn't have a sponge to use so the face paint wasn't going on Louis' skin as well as it should have and it was very streaky. We will purchase a sponge for the next time we try this. I think the red eyeshadow Louis used as bruising at the end looked much better, however there was a bit too much, especially in the camera. We need to make sure that what we create looks good in the camera.
...
...
MIA JONES
INSPIRATION
In the beginning, we took inspiration from the character Wichita in the movie Zombieland, played by Emma Stone. We were going to have Mia Jones dressed in a plain white, slightly baggy, V-neck top with a black leather jacket, blue ripped jeans and black flat boots.
 |
| Wichita in the middle |
Now we have changed up her outfit a bit for a bit more male gaze, a theory by Laura Mulvey (you can see my other post about this here). We took some inspiration from the musician PJ Harvey. She often wear a dress or skirt with some boots.
Mia Jones will be wearing a short black dress which has the same sort of shape as the first picture, besides the neck line. We will also have her wearing some black boots and a khaki thin jacket.
OUTFIT

These are sort of what the boots look like. They have this snake skin shiny print and the buckles but have a bit of a higher heel like the next photo.

The dress looks exactly the same as this with the slight slit on the left thigh. The length was inspired by the PJ Harvey dresses. It's going to be quite cold so I will wear skin coloured tights underneath.

This is what the khaki jacket looks like. It has a smaller collar than the one in this picture and it's slightly more cropped.
FILM EQUIPMENT
This post was originally created by Spikey Films
Here is a list of the equipment we will use to record our film opening:

 Small Tripod - convenient for worms eye view shots
iPhone 11 - the highest quality out of all iPhone cameras. Has a very wide angle lens (improving the issue of recording in small rooms). Similar quality to proper camera

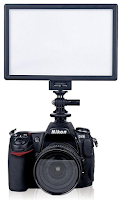
LED camera light - this means we can film in rooms that have slightly less light.
 Large Tripod - gives the shots stability and gives us the opportunity to adjust heights if need be
iPhone tripod adaptor - meaning we can attach the iPhone to the tripod
Gimbal - if we chose to use any tracking shots, it gives a very stabilised and professional look to the footage
CALL SHEETS
BATHROOM
BATHROOM Call Sheet from LouisHodges3
KITCHEN
Kitchen call sheet from LouisHodges3
No comments:
Post a Comment